
Purpose of the article: This blog explains about the process of how to automate data migration from Amazon vendor Central to Snowflake using Python and SP API.
Intended Audience: This article will help developers who work with API, Amazon Vendor Central and Amazon Seller Central, Snowflake.
Tools and Technology: Python, Snowflake, AWS, SP API.
Keywords: API Extraction, Amazon Vendor Central, Amazon SP API, SP API, Seller Central, Marketplace ID, Snowflake.
This blog is intended to guide the automation of data migration from the Amazon Vendor Central API to Snowflake, a powerful cloud data warehouse. The Amazon SP API offers a REST-based interface facilitating the extraction of vendor data, making it a vital resource for businesses. In this guide, we’ll explore a streamlined procedure for efficiently extracting various vendor reports using Python scripts from the SP API. Additionally, we’ll delve into seamlessly loading this extracted data into the Snowflake data warehouse.
Registering for an API Application:
- Please login to https://vendorcentral.amazon.com/ for registering your application.
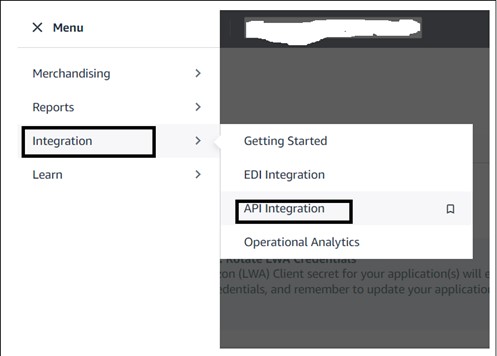
- Navigate to Menu bar, then Integration, and then API integration.
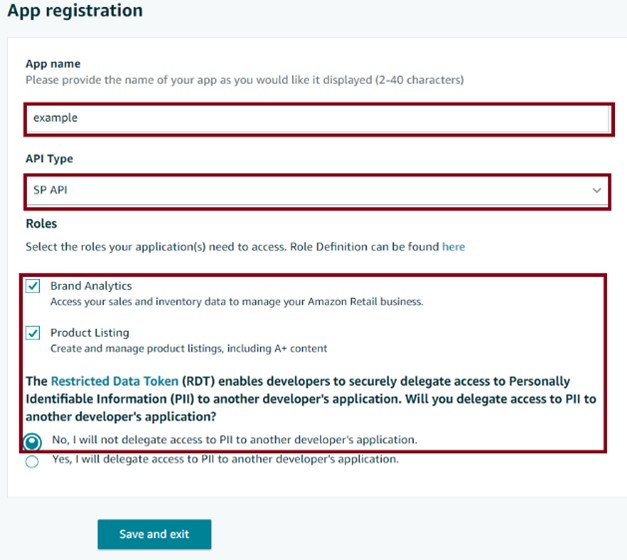
- Under “Develop Your Apps” section, select ‘Add new app client’ and then fill up the form with required details and save your application. Now, the app is registered successfully.
- You can confirm your app registration by navigating to integration > API integration, where your newly created app should be listed.
- Access to Snowflake, AWS, and Amazon Vendor Central.
- IAM user credentials (Access-key-ID, secret-access-key)
- LWA credentials (client-ID and Client-Secret). To obtain these details, register your application in the Amazon Vendor Central Portal.
- Refresh token.
Generating LWA Credentials and Refresh Token:
To obtain your LWA credentials, select your app and click on ‘VIEW’ under the LWA credentials section.
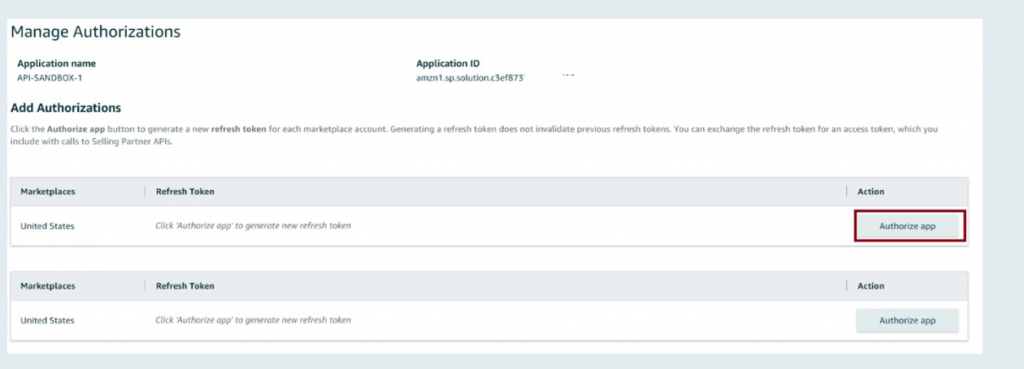
Choose the ‘Authorize’ option in the ‘Action’ section. You’ll then be directed to the ‘Manage Authorization’ page where you can select your desired marketplace and click ‘Authorize app.’ Additionally, a single app can obtain up to 10 refresh tokens for 10 different marketplaces.
Understanding API Endpoint-URLs, Marketplace-IDs:
Endpoint-URLs vary by region. Please ensure you use the correct URL corresponding to your region to authenticate the API and obtain temporary credentials for accessing other endpoints.
Refer this URL for more info https://developer-docs.amazon.com/sp-api/docs/sp-api-endpoints
Selling Region | End point URL | AWS Region |
North America | US-east-1 | |
Europe | EU-west-1 | |
Far-East | US-west-2 |
Each country has a unique marketplace ID to identify the marketplace in a request. https://developer-docs.amazon.com/sp-api/docs/marketplace-ids
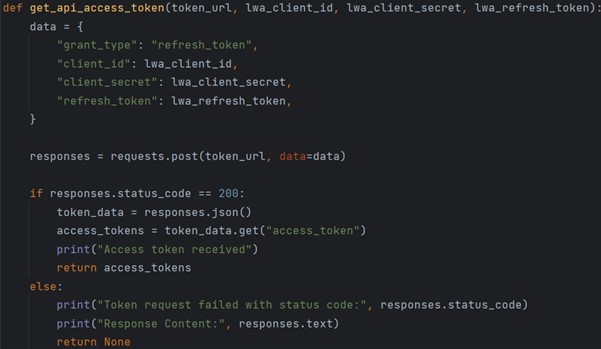
Users should utilize two authentication methods: one through API Gateway using the POST method, and the other through AWS STS using the GET-method. The POST-method involves leveraging LWA, while the GET-method utilizes AWS credentials.
POST_ENDPOINT_URL: https://api.amazon.com/auth/o2/token
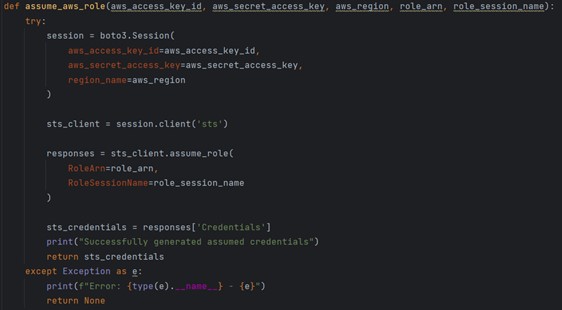
The following function connects to AWS STS service and generates temporary Access-key-ID and Secret-access-key.
This process entails four steps: first, create a Report ID using the POST method; next, generating Document ID and Document URL using the GET method. The URL incorporates data formatted as a binary string encrypted and compressed using GZIP.
Generating-Report-ID:
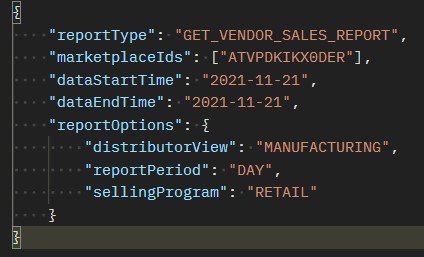
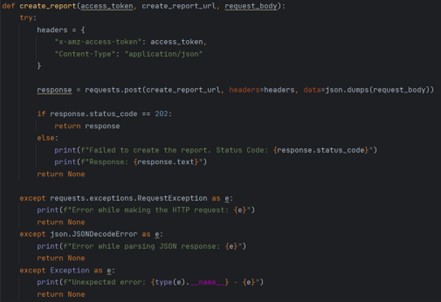
In this step, we employ the POST method, utilizing a temporary access token for authentication. The request body, formatted as raw data, includes the report type, marketplace IDs, start and end dates, and the report period (week, day, year). https://sellingpartnerapi-eu.amazon.com/reports/2021-06-30/reports
Generating-Report-Document-ID:
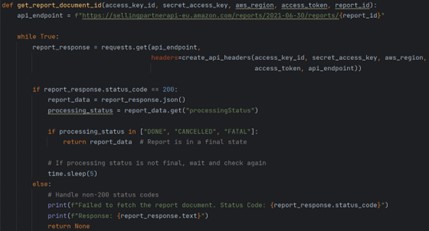
Utilize the GET method, employing AWS Signature and an access token for authentication. The request includes the ReportID. https://sellingpartnerapi-eu.amazon.com/reports/2021-06-30/reports/{reportId}
Generating Document URL:
Utilize the Get-method, employing AWS Signature and an access token for authentication. The request includes the ReportDocumentID. https://sellingpartnerapi-eu.amazon.com/reports/2021-06-30/documents/{reportdocumentId}
Generating CSV File from Document URL:
Once the document URL is obtained, utilize the GET method to retrieve Gzip-compressed data. Then, decompress the data and parse it into JSON format,
“json.loads (gzip.decompress(url_response.content).decode(‘utf-8’))”
Normalize the JSON data into a flattened structure,
“pd.json_normalize(json_data[normalize_value])”
The normalization process varies based on the report type; for example, for sales reports, the normalization value is salesByasin. Finally, export the normalized data to a CSV file.
Loading Data into Snowflake:
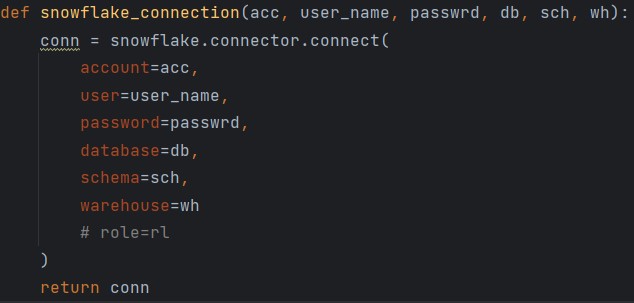
Provide the required details to connect with Snowflake and specify the table name where the data will be loaded.
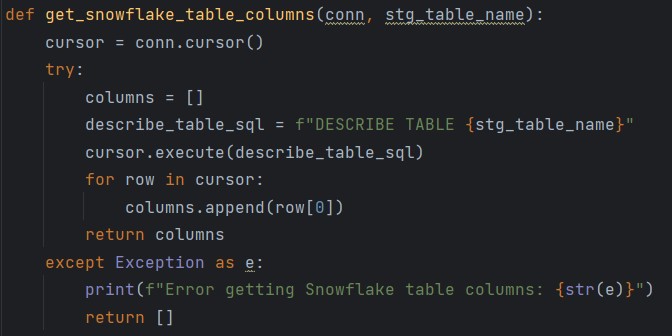
Once connected to snowflake, we then check for table description to avoid feature errors with table structure. We add missing columns to the data frame and fill with NAN; then we use “write_pandas” to load the data into snowflake table.
“write_pandas (conn, df, stg_table_name, overwrite=False)”
Advantages
- This script automates the entire process, data extraction, transformation, loading process, reducing manual effort and increasing efficiency.
- Enables the extraction of multiple reports across various marketplaces simultaneously.
- Easy to maintain and update, allowing for quick adjustments to accommodate changes in reporting requirements or API updates.
Conclusion:
To recap, this process demonstrates a streamlined approach to extracting data from Amazon SP API, processing it, and loading it into Snowflake for further analysis. By leveraging various authentication methods, handling different API requests, and utilizing efficient data processing techniques, organizations can seamlessly integrate and analyze their data, empowering informed decision-making and driving business growth.
References:
- https://developer-docs.amazon.com/sp-api/docs/sp-api-endpoints
- https://developer-docs.amazon.com/sp-api/docs/marketplace-ids
- https://developer-docs.amazon.com/sp-api/docs/reports-attributes
- https://developer-docs.amazon.com/sp-api/docs/using-postman-for-selling-partner-api-models
- https://developer-docs.amazon.com/sp-api/docs/register-as-a-private-developer
Author Bio:

Ruthwiz Reddy
Associative Software Engineer - Data Engineering-Analytic
I've been an Associate Software Engineer in Data Engineering at MOURI Tech for more than a year. possess solid experience with AWS Services, Snowflake, and the Python and SQL programming languages.