Purpose of the Article: In this blog, we have explained how we can implement Snowpipe on Azure cloud.
Intended Audience: This POC/blog will help which kinds of people, like developers working on snowflake and azure cloud
Tools and Technology: Snowflake and AZURE services
Key words: implement Snowpipe on Azure cloud.
Objective:
To create a Snowpipe on Azure external stage.
Snowflake Snowpipe Workflow:
The following steps describe the Snowpipe auto-ingestion process.
Architecture:
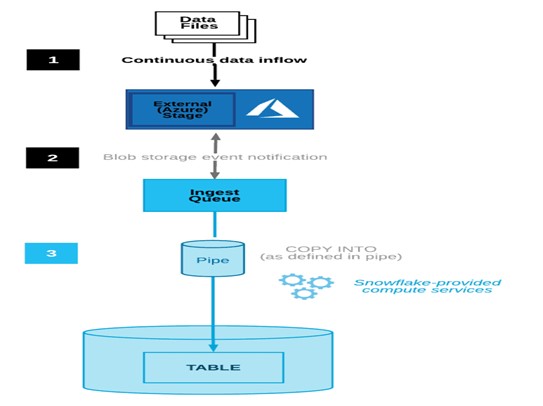
Establishing Azure Storage Event Notification
A notification rule in Azure must be set up to recognize the event of a new file arriving in Azure blob storage and inform Snowflake about it. Then, we need to line up the below services.
Storage Account
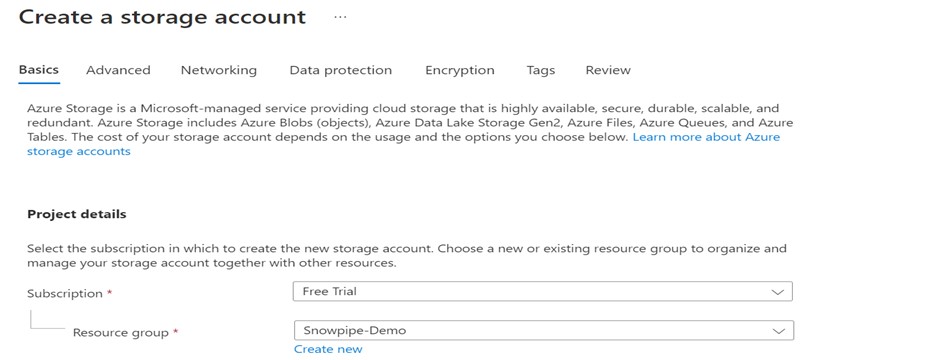
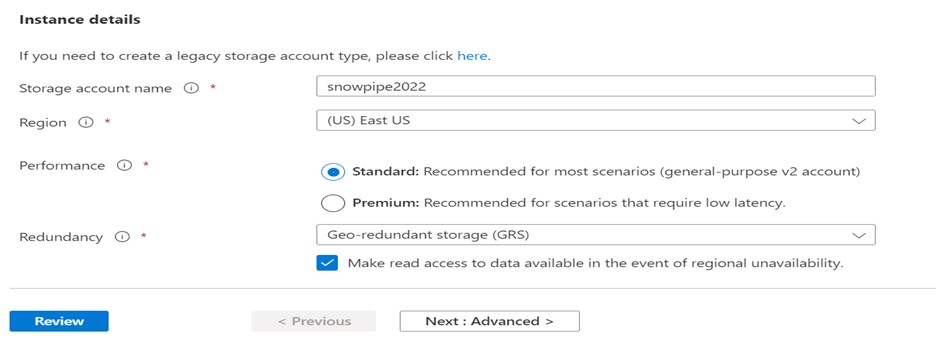
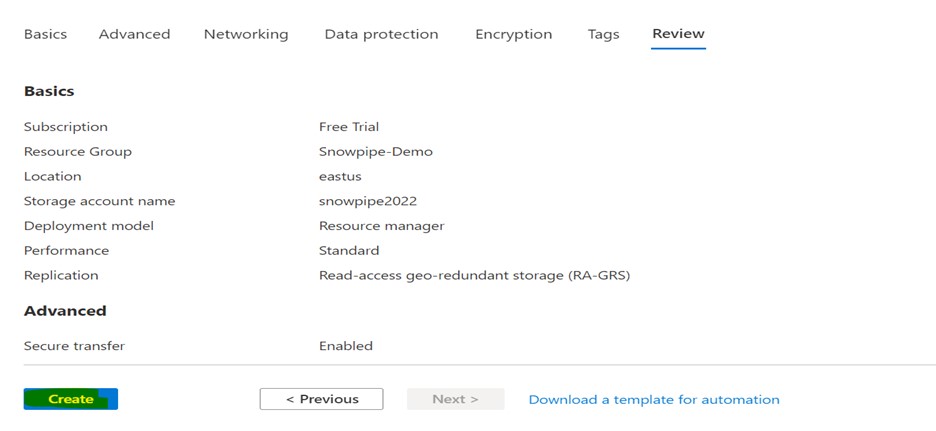
Go to the storage account in the Azure Console and create it.

After you provide the necessary information, like a subscription, resource group, and storage account name, and review it, click “create.”

Container
Create a container within your storage account, as shown below.
Navigate to Storage Account > Data Storage > Containers.
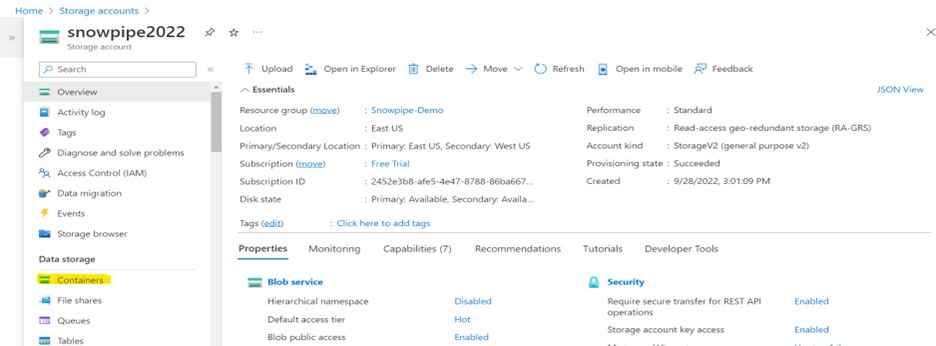
Click on the container and provide the required information.
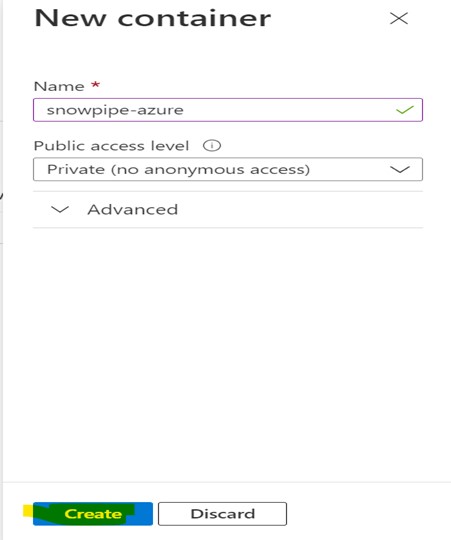

Storage Queue
Create a storage queue within your storage account as shown below.
Navigate to Storage Account > Data Storage > Queues.


Event Subscription
Create an event subscription within your storage account, as shown below.
Navigate to Storage Account > Events > Event Subscription.

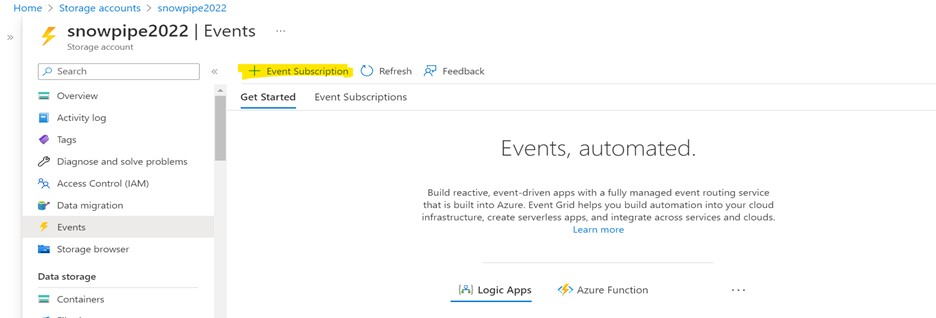
Choose a name for the Event Subscription.
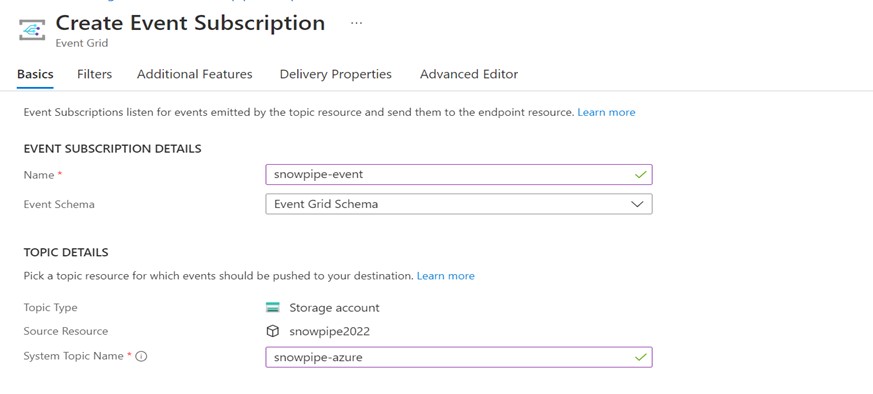
Choose the Event Type as Blob Created.

Choose the Endpoint Type as Storage Queues and choose the queue created in the previous step.
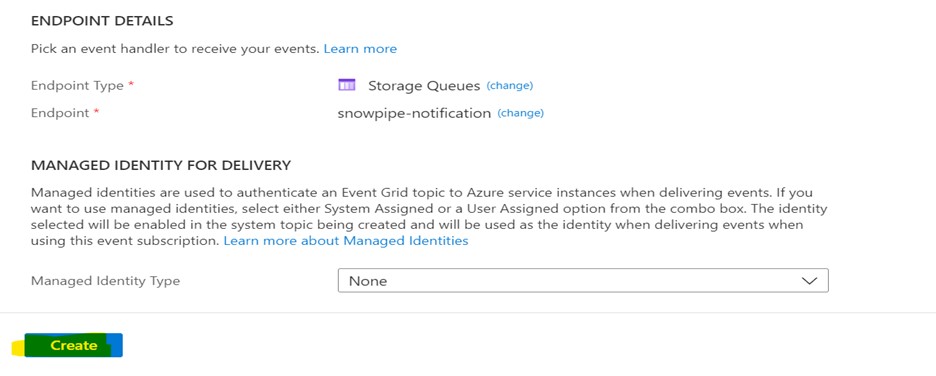

Whenever a Blob is created in the storage account and it sends the event message to the storage queue, the event subscription will identify those actions.
Steps to create Notification Integration in Snowflake
The below SQL script can be used to create Notification Integration in Snowflake.
USE ROLE ACCOUNTADMIN;
CREATE NOTIFICATION INTEGRATION AZURE_NOTIFICATION
ENABLED = TRUE
TYPE = QUEUE
NOTIFICATION_PROVIDER = AZURE_STORAGE_QUEUE
AZURE_STORAGE_QUEUE_PRIMARY_URI = ‘https://snowpipe2022.queue.core.windows.net/snowpipe-notification’
AZURE_TENANT_ID = ‘2ee22a16-7d4a-4b82-9d43-b505c1e201e4’;
GRANT USAGE ON INTEGRATION AZURE_NOTIFICATION TO ROLE SYSADMIN;

AZURE_STORAGE_QUEUE_PRIMARY_URI is the URL of the queue created previously.
AZURE_TENANT_ID can be obtained at the below location.
Home > Azure Active Directory > Properties
Granting access to the Storage Queue to Snowflake
The steps below can grant Snowflake access to the Azure Storage Queue.
1. Execute the below script to retrieve the Azure consent URL.
DESC NOTIFICATION INTEGRATION AZURE_NOTIFICATION.

2. Copy the AZURE_CONSENT_URLvalue and open it in a web browser. The below page displays Microsoft permissions requests.
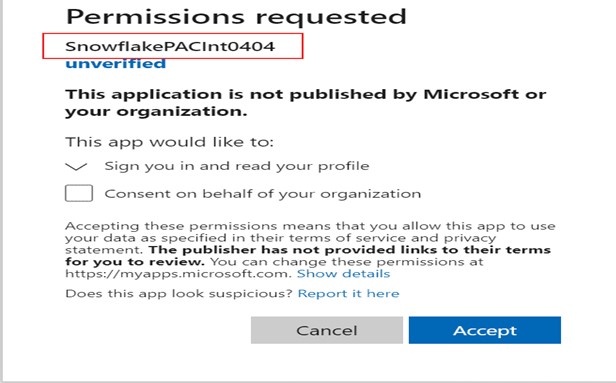
3. Acceptthe permission requested. Azure Service Principal will be created for the Snowflake account.
4. Open the Microsoft Azure portal and log in to it.
5. Navigate to Azure Active Directory> Enterprise applications and check the Snowflake application identifier.
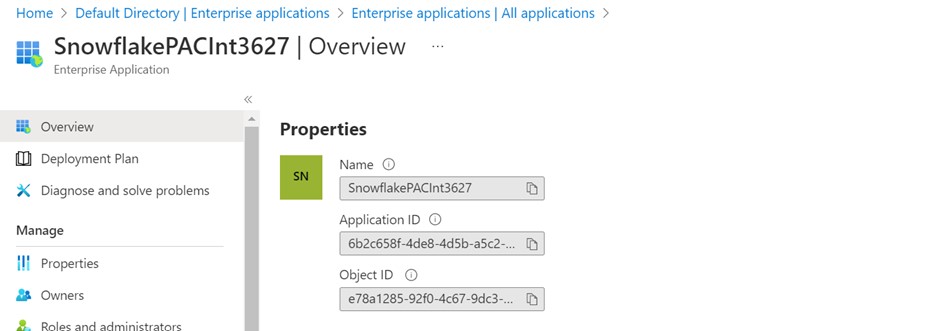
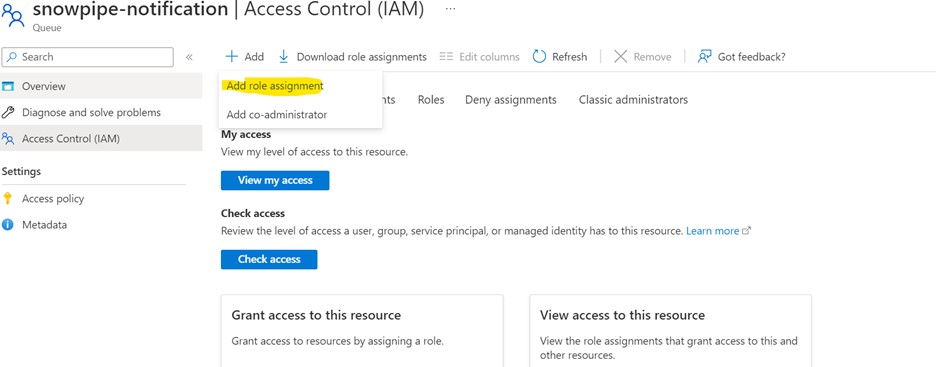
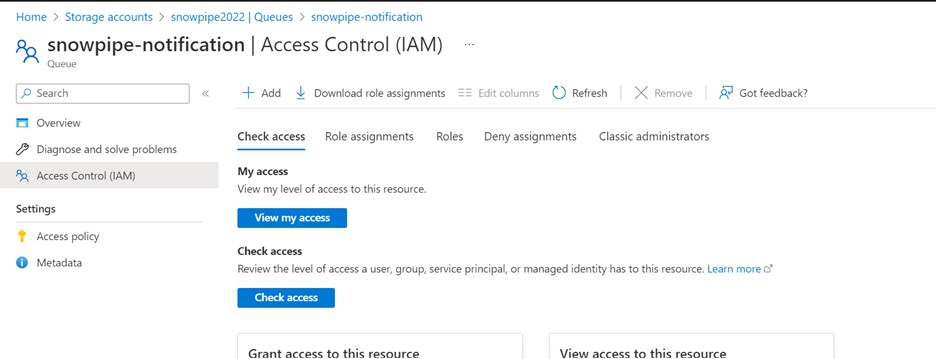
Review the details and assign the Storage Queue Data Contributor role to the Snowflake Service Principal.
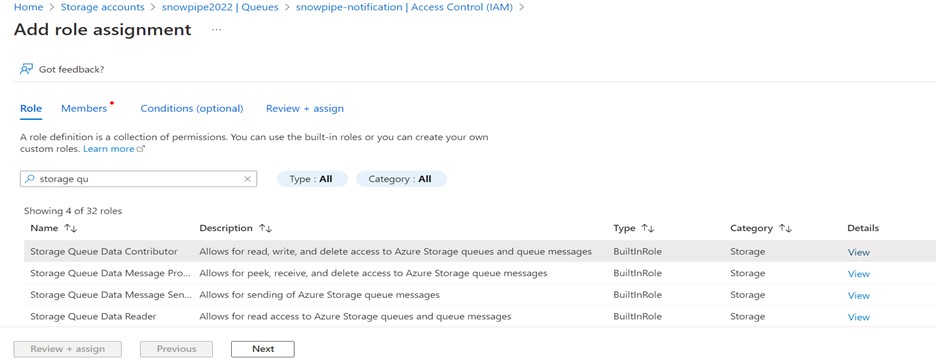
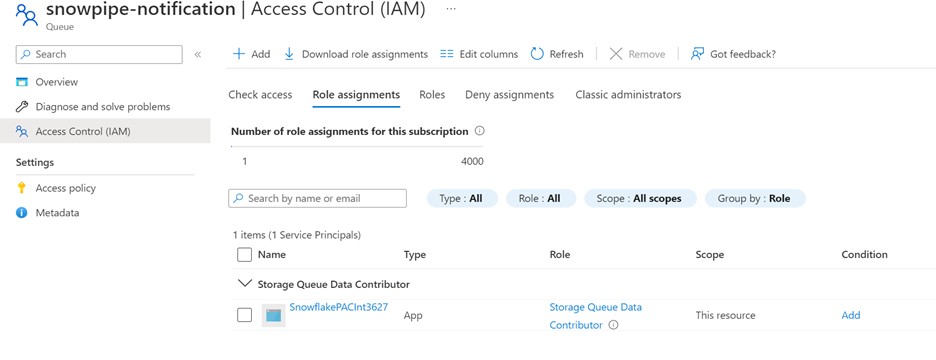
Add the two roles shown below.
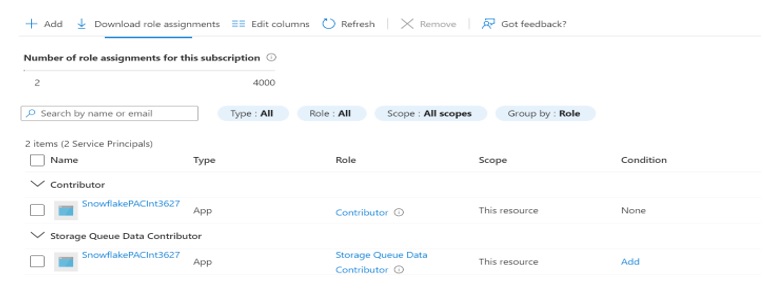
It Allows access to Snowflake to read, write, and delete Azure Storage queues and queue messages.
Creating a Snowflake Stage
To access the file from an external location like Microsoft Azure, we need to create external stages in Snowflake that invoke the Azure container where the file is to be placed.
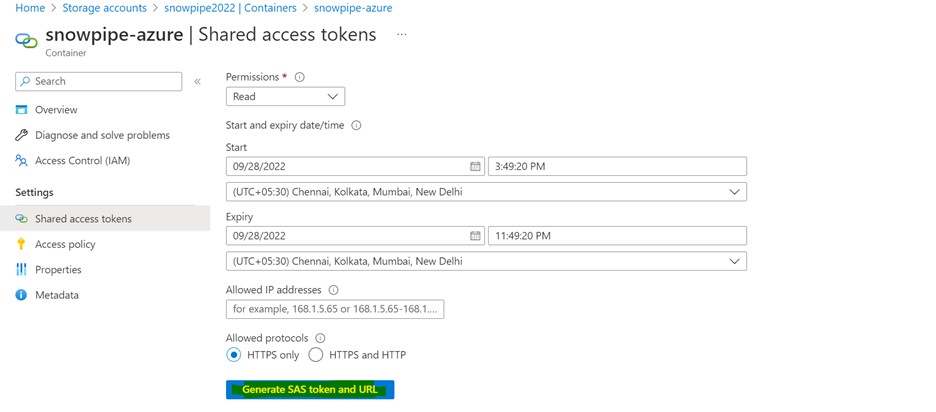
We will create it by providing the URL of the Azure container and a SAS token to authenticate.
CREATE OR REPLACE STAGE SNOWPIPE_AZURE
URL = ‘azure://snowpipe2022.blob.core.windows.net/Snowpipe-azure/’
credentials = (azure_sas_token=’?sp=r&st=2022-09-28T10:19:20Z&se=2022-09-28T18:19:20Z&spr=https&sv=2021-06-08&sr=c&sig=Nxq2uQOxPpNNzAvT6Y6XEGhadEOwintNh2sxRFK%2F2LY%3D’)
The URL will be obtained by navigating to
Storage Account > Container > container name > Properties.

The AZURE_SAS_TOKEN will be obtained by navigating to
Storage Account > Container > container name > Generate SAS
(OR)
Storage Account > Networking + security > Shared access signature


Creating a Snowflake Snowpipe
Before creating a Snowpipe, we will create a table to load the data from the stage.
CREATE OR REPLACE TABLE “EMPLOYEE” (
id STRING,
name STRING
);
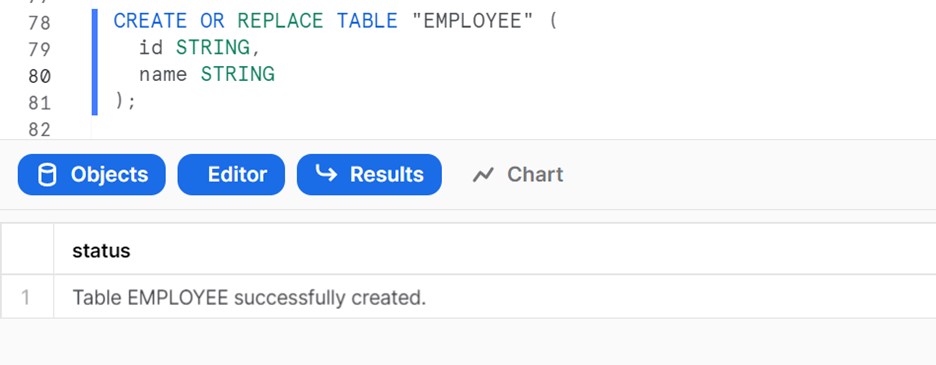
Now that the stage for reading the data file and the table to load the data have been created, we will build a pipe that moves data from the stage into the target table. This can be done by an object called PIPE, wrapped around a copy command.
We will also allow AUTO_INGEST and mention the file format for the source data, which will be CSV for this scenario.
CREATE OR REPLACE PIPE SNOWPIPE_FOR_AZURE
AUTO_INGEST = TRUE
INTEGRATION = AZURE_NOTIFICATION
AS
COPY INTO OUR_FIRST_DATABASE.SNOWPIPE_AZURE.EMPLOYEE FROM @SNOWPIPE_AZURE
FILE_FORMAT = (type = ‘CSV’);

AUTO_INGEST = TRUE allows automatic data loading when the file arrives within the staging location.
A file can be found in Azure Container. So, to handle the file, which may already be present in the staging location, use the below command.
ALTER PIPE SNOWPIPE_FOR_AZURE;


Whenever a new file comes, data will load to the target.
Monitoring pipe status and data loads
The below script can be used to see the status of the Pipe.
SELECT system$pipe_status(‘SNOWPIPE_FOR_AZURE’);

Specialist
An energetic and motivated data engineer with a passion for innovation, Ankita has 4+ years of experience in ETL methodology for data transformation using Talend, and AWS Matillion for redshift ETL. She also commands technical expertise in data warehouse and system development life cycle. Additionally, she has earned experience in deploying ‘Snowflake’.
| Cookie | Duration | Description |
|---|---|---|
| cookielawinfo-checkbox-analytics | 11 months | This cookie is set by GDPR Cookie Consent plugin. The cookie is used to store the user consent for the cookies in the category "Analytics". |
| cookielawinfo-checkbox-functional | 11 months | The cookie is set by GDPR cookie consent to record the user consent for the cookies in the category "Functional". |
| cookielawinfo-checkbox-necessary | 11 months | This cookie is set by GDPR Cookie Consent plugin. The cookies is used to store the user consent for the cookies in the category "Necessary". |
| cookielawinfo-checkbox-others | 11 months | This cookie is set by GDPR Cookie Consent plugin. The cookie is used to store the user consent for the cookies in the category "Other. |
| cookielawinfo-checkbox-performance | 11 months | This cookie is set by GDPR Cookie Consent plugin. The cookie is used to store the user consent for the cookies in the category "Performance". |
| viewed_cookie_policy | 11 months | The cookie is set by the GDPR Cookie Consent plugin and is used to store whether or not user has consented to the use of cookies. It does not store any personal data. |