
Introduction:
In today’s digital landscape, providing a seamless and secure user experience is paramount for any web application. One effective way to achieve this is by integrating Single Sign-On (SSO) functionality. Using SSO users can access multiple applications with just one set of credentials, enhancing convenience and reducing the need for multiple logins. We will explore how to implement Okta SSO in a React application, leveraging Okta’s robust authentication and authorization services.
Prerequisites:
Before diving into the implementation details, make sure you have the following prerequisites in place:
- A basic understanding of React and its ecosystem.
- Node.js and npm (Node Package Manager) installed on your system.
- An Okta developer account (if you don’t have one, sign up at https://developer.okta.com).
Step 1: Set up an Okta Application: To start the application, log in to your Okta developer account and create a new application. Follow these steps:
- Navigate to the Okta Developer Console and click on “Applications” in the top menu.
- Click the “Add Application” button and select “Single-Page App” as the application type.
- Provide a name for your application and give the base URI and redirect URIs for your React app.
- Once the application is created, note down the “Client ID” and “Issuer” values.
Step 2: Set up a React Application:
To create a React application and configure it to use Okta SSO.
- Open your terminal and run the following command to create a new React app:
![]()
- Change into the project directory:
![]()
- Install the necessary Okta libraries by running the following command:
![]()
Step 3: Configure Okta in the React App:
Next, we need to configure Okta in our React application. Open the `src/App.js` file and update it with the following code:
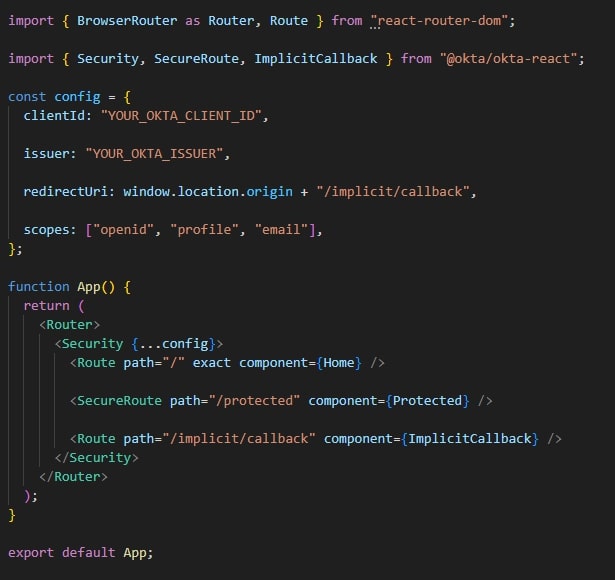
Replace `’YOUR_OKTA_CLIENT_ID’` and `’YOUR_OKTA_ISSUER’` with the corresponding values from your Okta application.
Step 4: Create Protected and Home Components:
Let’s create two new components, `Home.js` and `Protected.js` to simulate protected and unprotected routes in our application. Create these files inside the `src` folder and populate them with the following content:
`src/Home.js`:
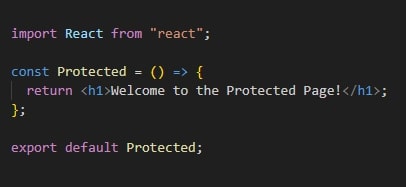
`src/Protected.js`:

Step 5: Start the React App:
Finally, start the React application by running the following command:
![]()
Visit `http://localhost:3000` in your browser and see the Home page. If you navigate to `http://localhost:3000/protected`, you will be navigated to the Okta login page. After successful authentication, you’ll return to the Protected page.
GitLab:
Click here and checkout to the repository for your reference.
Conclusion:
Integrating Okta Single Sign-On (SSO) into your React application can enhance user experience and strengthen security. This blog covered the Okta application setup, configuring Okta in a React app, and creating protected routes. With this foundation, you can further explore Okta’s features to customize and extend the authentication and authorization capabilities of the application. Happy coding!
References:
- https://developer.okta.com/docs/guides/sign-in-to-spa-authjs/react/main/
- https://developer.okta.com/docs/guides/sign-in-to-spa-embedded-widget/react/main/
- https://blog.logrocket.com/implementing-okta-authentication-react-app/
- https://medium.com/ne-digital/how-to-integrate-okta-with-a-react-app-9d87f9893f8b
- https://javascript.plainenglish.io/add-a-simple-authentication-to-your-react-app-de8add1e3278